What is Selenium? Introduction to Selenium Automation Testing
What is Selenium?
Selenium is a free (open-source) automated testing framework used to validate web applications across different browsers and platforms. You can use multiple programming languages like Java, C#, Python, etc to create Selenium Test Scripts. Testing done using the Selenium testing tool is usually referred to as Selenium Testing.
Selenium Tool Suite
Selenium Software is not just a single tool but a suite of software, each piece catering to different Selenium QA testing needs of an organization. Here is the list of tools
- Selenium Integrated Development Environment (IDE)
- Selenium Remote Control (RC)
- WebDriver
- Selenium Grid

Who developed Selenium?
Since Selenium is a collection of different tools, it also had different developers. Below are the key persons who made notable contributions to the Selenium Project

Primarily, Selenium was created by Jason Huggins in 2004. An engineer at ThoughtWorks, he was working on a web application that required frequent testing. Having realized that their application’s repetitious Manual Testing was becoming increasingly inefficient, he created a JavaScript program that would automatically control the browser’s actions. He named this program the “JavaScriptTestRunner.”
Seeing potential in this idea to help automate other web applications, he made JavaScriptRunner open-source, which was later re-named Selenium Core. For those interested in exploring other options for web application testing, take a look at these Selenium alternatives.
The Same Origin Policy Issue
Same Origin policy prohibits JavaScript code from accessing elements from a domain that is different from where it was launched. Example, the HTML code in www.google.com uses a JavaScript program “randomScript.js”. The same origin policy will only allow randomScript.js to access pages within google.com such as google.com/mail, google.com/login, or google.com/signup. However, it cannot access pages from different sites such as yahoo.com/search because they belong to different domains.

This is the reason why prior to Selenium RC, testers needed to install local copies of both Selenium Core (a JavaScript program) and the web server containing the web application being tested so they would belong to the same domain
Birth of Selenium Remote Control (Selenium RC)
.png "Introduction to Selenium")
Unfortunately; testers using Selenium Core had to install the whole application under test and the web server on their own local computers because of the restrictions imposed by the same origin policy. So another ThoughtWork’s engineer, Paul Hammant, decided to create a server that will act as an HTTP proxy to “trick” the browser into believing that Selenium Core and the web application being tested come from the same domain. This system became known as the Selenium Remote Control or Selenium 1.
Birth of Selenium Grid
.jpg "Introduction to Selenium")
Selenium Grid was developed by Patrick Lightbody to address the need of minimizing test execution times as much as possible. He initially called the system “Hosted QA.” It was capable of capturing browser screenshots during significant stages, and also of sending out Selenium commands to different machines simultaneously.
Birth of Selenium IDE
.jpg "Introduction to Selenium")
Shinya Kasatani of Japan created Selenium IDE, a Firefox and Chrome extension that can automate the browser through a record-and-playback feature. He came up with this idea to further increase the speed in creating test cases. He donated Selenium IDE to the Selenium Project in 2006.
Birth of WebDriver
.jpg "Introduction to Selenium")
Simon Stewart created WebDriver circa 2006 when browsers and web applications were becoming more powerful and more restrictive with JavaScript programs like Selenium Core. It was the first cross-platform testing framework that could control the browser from the OS level.
Birth of Selenium 2
In 2008, the whole Selenium Team decided to merge WebDriver and Selenium RC to form a more powerful tool called Selenium 2, with WebDriver being the core. Currently, Selenium RC is still being developed but only in maintenance mode. Most of the Selenium Project’s efforts are now focused on Selenium 2.
So, Why the Name Selenium?
The Name Selenium came from a joke that Jason cracked once to his team. During Selenium’s development, another automated testing framework was popular made by the company called Mercury Interactive (yes, the company who originally made QTP before it was acquired by HP). Since Selenium is a well-known antidote for Mercury poisoning, Jason suggested that name and his teammates took it. So that is how we got to call this framework up to the present.

Selenium Integrated Development Environment (IDE) is the simplest framework in the Selenium suite and is the easiest one to learn. It is a Chrome and Firefox plugin that you can install as easily as you can with other plugins. However, because of its simplicity, Selenium IDE should only be used as a prototyping tool. If you want to create more advanced test cases, you will need to use either Selenium RC or WebDriver.

What is Selenium Remote Control (Selenium RC)?
Selenium RC was the flagship testing framework of the whole Selenium project for a long time. This is the first automated web testing tool that allows users to use a programming language they prefer. As of version 2.25.0, RC can support the following programming languages:
- Java
- C#
- PHP
- Python
- Perl
- Ruby

What is WebDriver?
The WebDriver proves to be better than Selenium IDE and Selenium RC in many aspects. It implements a more modern and stable approach in automating the browser’s actions. WebDriver, unlike Selenium RC, does not rely on JavaScript for Selenium Automation Testing. It controls the browser by directly communicating with it.
The supported languages are the same as those in Selenium RC.
- Java
- C#
- PHP
- Python
- Perl
- Ruby

What is Selenium Grid?
Selenium Grid is a tool used together with Selenium RC to run parallel tests across different machines and different browsers all at the same time. Parallel execution means running multiple tests at once.
Features:
- Enables simultaneous running of tests in multiple browsers and environments.
- Saves time enormously.
- Utilizes the hub-and-nodes concept. The hub acts as a central source of Selenium commands to each node connected to it.
Because of their architectural differences, Selenium IDE, Selenium RC, and WebDriver support different sets of browsers and operating environments.
| Selenium IDE | WebDriver | |
|---|---|---|
| Browser Support | Mozilla Firefox and Chrome | Google Chrome 12+ Firefox Internet Explorer 7+ and Edge Safari, HtmlUnit and PhantomUnit |
| Operating System | Windows, Mac OS X, Linux | All operating systems where the browsers above can run. |
Note: Opera Driver no longer works
How to Choose the Right Selenium Tool for Your Need
| Tool | Why Choose? |
|---|---|
| Selenium IDE |
|
| Selenium RC |
|
| WebDriver |
|
| Selenium Grid |
|
Quick Test Professional(QTP) is a proprietary automated testing tool previously owned by the company Mercury Interactive before Hewlett-Packard acquired it in 2006. Its later owner is MicroFocus and the tool is renamed UFT one. The Selenium Tool Suite has many advantages over QTP as detailed below –
Advantages and Benefits of Selenium over QTP
| Selenium | QTP |
|---|---|
| Open source, free to use, and free of charge. | Commercial. |
| Highly extensible | Limited add-ons |
| Can run tests across different browsers | Can only run tests in Firefox, Internet Explorer and Chrome |
| Supports various operating systems | Can only be used in Windows |
| Supports mobile devices | QTP Supports Mobile app test automation (iOS & Android) using HP solution called – HP Mobile Center |
| Can execute tests while the browser is minimized | Needs to have the application under test to be visible on the desktop |
| Can execute tests in parallel. | Can only execute in parallel but using Quality Center which is again a paid product. |
Advantages of QTP over Selenium
| QTP | Selenium |
|---|---|
| Can test both web and desktop applications | Can only test web applications |
| Comes with a built-in object repository | Has no built-in object repository |
| Automates faster than Selenium because it is a fully featured IDE. | Automates at a slower rate because it does not have a native IDE, and only third-party IDE can be used for development. |
| Data-driven testing is easier to perform because it has built-in global and local data tables. | Data-driven testing is more cumbersome since you have to rely on the programming language’s capabilities for setting values for your test data |
| Can access controls within the browser(such as the Favorites bar, Address bar, Back and Forward buttons, etc.) | Cannot access elements outside of the web application under test |
| Provides professional customer support | No official user support is being offered. |
| Has native capability to export test data into external formats | Has no native capability to export runtime data onto external formats |
| Parameterization Support is built | Parameterization can be done via programming but is difficult to implement. |
| Test Reports are generated automatically | No native support to generate test /bug reports. |
Though clearly, QTP has more advanced capabilities, Selenium outweighs QTP in three main areas:
- Cost(because Selenium is completely free)
- Flexibility(because of a number of programming languages, browsers, and platforms it can support)
- Parallel testing(something that QTP is capable of but only with use of Quality Center)
Summary
- The entire Selenium Software Testing Suite is comprised of four components:
- Selenium IDE, a Firefox and chrome add-on that you can only use in creating relatively simple test cases and test suites.
- Selenium Remote Control, also known as Selenium 1, is the first Selenium tool that allowed users to use programming languages in creating complex tests.
- WebDriver, is the newer breakthrough that allows your test scripts to communicate directly to the browser, thereby controlling it from the OS level.
- Selenium Grid is also a tool that is used with Selenium RC to execute parallel tests across different browsers and operating systems.
- Selenium RC and WebDriver was merged to form Selenium 2.
- Selenium is more advantageous than Microfocus UFT One in terms of costs and flexibility.
What is Selenium WebDriver?
What is Selenium Webdriver?
Selenium Webdriver is an open-source collection of APIs which is used for testing web applications. The Selenium Webdriver tool is used for automating web application testing to verify that it works as expected or not. It mainly supports browsers like Firefox, Chrome, Safari and Internet Explorer. It also permits you to execute cross-browser testing.
WebDriver also enables you to use a programming language in creating your test scripts (not possible in Selenium IDE).
You can now use conditional operations like if-then-else or switch-case. You can also perform looping like do-while.

- Java
- .Net
- PHP
- Python
- Perl
- Ruby
You do not have to know all of them. You just need to be knowledgeable in one. However, in this tutorial, we will be using Java with Eclipse as our IDE.
Architecture of Selenium Webdriver
Selenium WebDriver architecture comprises following components;.
- It controls the browser from the OS level
- All you need are your programming language’s IDE (which contains your Selenium commands) and a browser.

Speed

WebDriver is faster than Selenium RC since it speaks directly to the browser uses the browser’s own engine to control it.

WebDriver interacts with page elements in a more realistic way. For example, if you have a disabled text box on a page you were testing, WebDriver really cannot enter any value in it just as how a real person cannot.
API

WebDriver’s API is simple. It does not contain redundant and confusing commands.
Browser Support

WebDriver can support the headless HtmlUnit browser
HtmlUnit is termed as “headless” because it is an invisible browser – it is GUI-less.
It is a very fast browser because no time is spent in waiting for page elements to load. This accelerates your test execution cycles.
Since it is invisible to the user, it can only be controlled through automated means.
Limitations of WebDriver
WebDriver Cannot Readily Support New Browsers
Remember that WebDriver operates on the OS level. Also, remember that different browsers communicate with the OS in different ways. If a new browser comes out, it may have a different process of communicating with the OS as compared to other browsers. So, you have to give the WebDriver team quite some time to figure that new process out before they can implement it on the next WebDriver release.
However, it is up to the WebDriver’s team of developers to decide if they should support the new browser or not.
Summary
- WebDriver is a tool for testing web applications across different browsers using different programming languages.
- You are now able to make powerful tests because WebDriver allows you to use a programming language of your choice in designing your tests.
- WebDriver is faster because of its simpler architecture.
- WebDriver directly talks to the browser
- WebDriver’s API is more concise.
- WebDriver can support HtmlUnit.
- The only drawbacks of WebDriver are: 1. It cannot readily support new browsers. 2. It does not have a built-in command for automatic generation of test results.
How to Download & Install Selenium WebDriver
Selenium WebDriver Installation
Selenium installation is a 3-step process:
Step 1: Install Java SDK
Step 2: Install Eclipse
Step 3: Install Selenium Webdriver Files
Step 4: Configure Eclipse IDE with WebDriver
In this tutorial, we will learn how to install Selenium Webdriver. Below is the detailed process
NOTE: The versions of Java, Eclipse, Selenium will keep updating with time. But the installation steps will remain the same. Please select the latest version and continue the installation steps below-
Step 1 – Install Java Software Development Kit (JDK)
Download and install the Java Software Development Kit (JDK) here.

This JDK version comes bundled with Java Runtime Environment (JRE), so you do not need to download and install the JRE separately.
Once installation is complete, open command prompt and type “java”. If you see the following screen you are good to move to the next step.

Step 2 – Install Eclipse IDE
Download the latest version of “Eclipse IDE for Java Developers” here. Be sure to choose correctly between Windows 32 Bit and 64 Bit versions.

You should be able to download an exe file named “eclipse-inst-win64” for Setup.
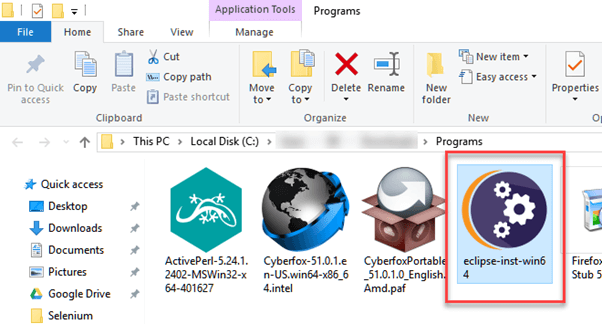
Double-click on a file to Install the Eclipse. A new window will open. Click Eclipse IDE for Java Developers.

After that, a new window will open which click button marked 1 and change path to “C:\eclipse”. Post that Click on the Install button marked 2

After successful completion of the installation procedure, a window will appear. On that window click on Launch.
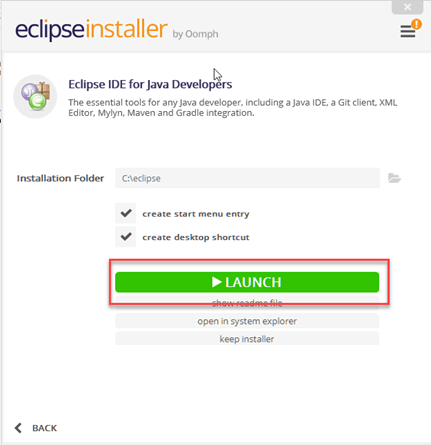
This will start eclipse neon IDE for you.
Step 3 – Selenium WebDriver Installation
You can download Selenium Webdriver for Java Client Driver here. You will find client drivers for other languages there, but only choose the one for Java.

This download comes as a ZIP file named “selenium-3.14.0.zip”. For simplicity of Selenium installation on Windows 10, extract the contents of this ZIP file on your C drive so that you would have the directory “C:\selenium-3.14.0\”. This directory contains all the JAR files that we would later import on Eclipse for Selenium setup.
Step 4 – Configure Eclipse IDE with WebDriver
- Launch the “eclipse.exe” file inside the “eclipse” folder that we extracted in step 2. If you followed step 2 correctly, the executable should be located on C:\eclipse\eclipse.exe.
- When asked to select for a workspace, just accept the default location.

3. Create a new project through File > New > Java Project. Name the project as “newproject”.

A new pop-up window will open. Enter details as follow
- Project Name
- Location to save a project
- Select an execution JRE
- Select the layout project option
- Click on the Finish button

4. In this step,
- Right-click on the newly created project and
- Select New > Package, and name that package as “newpackage”.

A pop-up window will open to name the package,
- Enter the name of the package
- Click on the Finish button

5. Create a new Java class under newpackage by right-clicking on it and then selecting- New > Class, and then name it as “MyClass”. Your Eclipse IDE should look like the image below.

When you click on Class, a pop-up window will open, enter details as
- Name of the class
- Click on the Finish button


Now selenium WebDriver’s into Java Build Path
In this step,
- Right-click on “newproject” and select Properties.
- On the Properties dialog, click on “Java Build Path”.
- Click on the Libraries tab, and then
- Click on “Add External JARs..”

When you click on “Add External JARs..” It will open a pop-up window. Select the JAR files you want to add.

After selecting jar files, click on OK button.
Select all files inside the lib folder.

Select files outside lib folder

Once done, click “Apply and Close” button

6. Add all the JAR files inside and outside the “libs” folder. Your Properties dialog should now look similar to the image below.

7. Finally, click OK and we are done importing Selenium libraries into our project.
Different Drivers
HTMLUnit is the only browsers that WebDriver can directly automate – meaning that no other separate component is needed to install or run while the test is being executed. For other browsers, a separate program is needed. That program is called as the Driver Server.
A driver server is different for each browser. For example, Internet Explorer has its own driver server which you cannot use on other browsers. Below is the list of driver servers and the corresponding browsers that use them.
You can download these drivers here
| Browser | Name of Driver Server | Remarks |
|---|---|---|
| HTMLUnit | HtmlUnitDriver | WebDriver can drive HTMLUnit using HtmlUnitDriver as driver server |
| Firefox | Mozilla GeckoDriver | WebDriver can drive Firefox without the need of a driver server Starting Firefox 45 & above one needs to use gecko driver created by Mozilla for automation |
| Internet Explorer | Internet Explorer Driver Server | Available in 32 and 64-bit versions. Use the version that corresponds to the architecture of your IE |
| Chrome | ChromeDriver | Though its name is just “ChromeDriver”, it is, in fact, a Driver Server, not just a driver. The current version can support versions higher than Chrome v.21 |
| Opera | OperaDriver | Though its name is just “OperaDriver”, it is, in fact, a Driver Server, not just a driver. |
| PhantomJS | GhostDriver | PhantomJS is another headless browser, just like HTMLUnit. |
| Safari | SafariDriver | Though its name is just “SafariDriver”, it is, in fact, a Driver Server, not just a driver. |
Summary
Aside from a browser, you will need the following to start using WebDriver
- Java Development Kit (JDK). https://www.oracle.com/java/technologies/downloads/
- Eclipse IDE – http://www.eclipse.org/downloads/
- Java Client Driver – https://www.selenium.dev/downloads/
When starting a WebDriver project in Eclipse, do not forget to import the Java Client Driver files onto your project. These files will constitute your Selenium Library.
With a new version of Selenium, there is no browser that you can automate without the use of a Driver Server.
Selenium Webdriver Java Program Example (Sample Code)
Selenium Java Example
Using the Java class “myclass” that we created in the previous tutorial, let us try to create a WebDriver script that would:
Step 1: fetch Mercury Tours’ homepage
Step 2: verify its title
Step 3: print out the result of the comparison
Step 4: close it before ending the entire program.
Selenium WebDriver Sample Code
Below is the actual WebDriver code for the logic presented by the scenario above
package newproject;
import org.openqa.selenium.WebDriver;
import org.openqa.selenium.firefox.FirefoxDriver;
//comment the above line and uncomment below line to use Chrome
//import org.openqa.selenium.chrome.ChromeDriver;
public class PG1 {


    public static void main(String[] args) {
        // declaration and instantiation of objects/variables
    	System.setProperty("webdriver.gecko.driver","C:\\geckodriver.exe");
		WebDriver driver = new FirefoxDriver();
		//comment the above 2 lines and uncomment below 2 lines to use Chrome
		//System.setProperty("webdriver.chrome.driver","G:\\chromedriver.exe");
		//WebDriver driver = new ChromeDriver();

        String baseUrl = "http://demo.com/test/newtours/";
        String expectedTitle = "Welcome: Mercury Tours";
        String actualTitle = "";

        // launch Fire fox and direct it to the Base URL
        driver.get(baseUrl);

        // get the actual value of the title
        actualTitle = driver.getTitle();

        /*
         * compare the actual title of the page with the expected one and print
         * the result as "Passed" or "Failed"
         */
        if (actualTitle.contentEquals(expectedTitle)){
            System.out.println("Test Passed!");
        } else {
            System.out.println("Test Failed");
        }

        //close Fire fox
        driver.close();
    }

}
Linux Tutorial for Beginners: Introduction to Linux Operating.1:
Note: Starting Firefox 35, you need to use gecko driver created by Mozilla to use Web Driver. Selenium 3.0, gecko and firefox has compatibility issues and setting them correctly could become an uphill task. If the code does not work, downgrade to Firefox version 47 or below. Alternatively, you can run your scripts on Chrome. Selenium works out of the box for Chrome. You just need to change 3 lines of code to make your script work with Chrome or Firefox
Explaining the code
Importing Packages
To get started, you need to import following two packages:
- org.openqa.selenium.*– contains the WebDriver class needed to instantiate a new browser loaded with a specific driver
- org.openqa.selenium.firefox.FirefoxDriver – contains the FirefoxDriver class needed to instantiate a Firefox-specific driver onto the browser instantiated by the WebDriver class
If your test needs more complicated actions such as accessing another class, taking browser screenshots, or manipulating external files, definitely you will need to import more packages.
Instantiating objects and variables
Normally, this is how a driver object is instantiated.
WebDriver driver = new FirefoxDriver();
A FirefoxDriver class with no parameters means that the default Firefox profile will be launched by our Java program. The default Firefox profile is similar to launching Firefox in safe mode (no extensions are loaded).
For convenience, we saved the Base URL and the expected title as variables.
Get the Actual Page Title
The WebDriver class has the getTitle() method that is always used to obtain the page title of the currently loaded page.
actualTitle = driver.getTitle();
Compare the Expected and Actual Values
This portion of the code simply uses a basic Java if-else structure to compare the actual title with the expected one.
if (actualTitle.contentEquals(expectedTitle)){
            System.out.println("Test Passed!");
        } else {
            System.out.println("Test Failed");
        }
Terminating a Browser Session
The “close()” method is used to close the browser window.
driver.close();
Terminating the Entire Program
If you use this command without closing all browser windows first, your whole Java program will end while leaving the browser window open.
System.exit(0);
Running the Test
There are two ways to execute code in Eclipse IDE.
- On Eclipse’s menu bar, click Run > Run.
- Press Ctrl+F11 to run the entire code.
.png "Creating your First Script in Webdriver")
If you did everything correctly, Eclipse would output “Test Passed!”
.png "Creating your First Script in Webdriver")
Locating GUI Elements
Locating elements in WebDriver is done by using the “findElement(By.locator())” method. The “locator” part of the code is same as any of the locators previously discussed in the Selenium IDE chapters of these tutorials. Infact, it is recommended that you locate GUI elements using IDE and once successfully identified export the code to WebDriver.
Here is a Selenium sample code that locates an element by its id. Facebook is used as the Base URL.
package newproject;
import org.openqa.selenium.By;
import org.openqa.selenium.WebDriver;
import org.openqa.selenium.firefox.FirefoxDriver;

public class PG2 {
    public static void main(String[] args) {
    	System.setProperty("webdriver.gecko.driver","C:\\geckodriver.exe");
    	WebDriver driver = new FirefoxDriver();
        String baseUrl = "http://www.facebook.com";
        String tagName = "";

        driver.get(baseUrl);
        tagName = driver.findElement(By.id("email")).getTagName();
        System.out.println(tagName);
        driver.close();
        System.exit(0);
}
}
We used the getTagName() method to extract the tag name of that particular element whose id is “email”. When run, this code should be able to correctly identify the tag name “input” and will print it out on Eclipse’s Console window.
.png "Creating your First Script in Webdriver")
Summary for locating elements
| Variation | Description | Sample |
|---|---|---|
| By.className | finds elements based on the value of the “class” attribute | findElement(By.className(“someClassName”)) |
| By.cssSelector | finds elements based on the driver’s underlying CSS Selector engine | findElement(By.cssSelector(“input#email”)) |
| By.id | locates elements by the value of their “id” attribute | findElement(By.id(“someId”)) |
| By.linkText | finds a link element by the exact text it displays | findElement(By.linkText(“REGISTRATION”)) |
| By.name | locates elements by the value of the “name” attribute | findElement(By.name(“someName”)) |
| By.partialLinkText | locates elements that contain the given link text | findElement(By.partialLinkText(“REG”)) |
| By.tagName | locates elements by their tag name | findElement(By.tagName(“div”)) |
| By.xpath | locates elements via XPath | findElement(By.xpath(“//html/body/div/table/tbody/tr/td[2]/table/ tbody/tr[4]/td/table/tbody/tr/td[2]/table/tbody/tr[2]/td[3]/ form/table/tbody/tr[5]”)) |
Note on Using findElement(By.cssSelector())
By.cssSelector() does not support the “contains” feature. Consider the Selenium IDE code below –
.png "Creating your First Script in Webdriver")
In Selenium IDE above, the entire test passed. However in the Selenium WebDriver script below, the same test generated an error because WebDriver does not support the “contains” keyword when used in the By.cssSelector() method.
.png "Creating your First Script in Webdriver")
Common Commands
Instantiating Web Elements
Instead of using the long “driver.findElement(By.locator())” syntax every time you will access a particular element, we can instantiate a WebElement object for it. The WebElement class is contained in the “org.openqa.selenium.*” package.
.png "Creating your First Script in Webdriver")
Clicking on an Element
Clicking is perhaps the most common way of interacting with web elements. The click() method is used to simulate the clicking of any element. The following Selenium Java example shows how click() was used to click on Mercury Tours’ “Sign-In” button.
![]()
Following things must be noted when using the click() method.
- It does not take any parameter/argument.
- The method automatically waits for a new page to load if applicable.
- The element to be clicked-on, must be visible (height and width must not be equal to zero).
Get Commands
Get commands fetch various important information about the page/element. Here are some important “get” commands you must be familiar with.
| Commands | Usage |
|---|---|
| get() Sample usage: |
|
| getTitle() Sample usage: |
|
| getPageSource() Sample usage: |
|
| getCurrentUrl() Sample usage: |
|
| getText() Sample usage: |
|
Navigate commands
These commands allow you to refresh,go-into and switch back and forth between different web pages.
| navigate().to() Sample usage: |
|
| navigate().refresh() Sample usage: |
|
| navigate().back() Sample usage: |
|
| navigate().forward() Sample usage: |
|
Closing and Quitting Browser Windows
| close() Sample usage: |
|
| quit() Sample usage: |
|

To clearly illustrate the difference between close() and quit(), try to execute the code below. It uses a webpage that automatically pops up a window upon page load and opens up another after exiting.
.png "Creating your First Script in Webdriver")
Notice that only the parent browser window was closed and not the two pop-up windows.

But if you use quit(), all windows will be closed – not just the parent one. Try running the code below and you will notice that the two pop-ups above will automatically be closed as well.
package newproject;
import org.openqa.selenium.WebDriver;
import org.openqa.selenium.firefox.FirefoxDriver;

public class PG3 {
    public static void main(String[] args) {
    	System.setProperty("webdriver.gecko.driver","C:\\geckodriver.exe");
    	WebDriver driver = new FirefoxDriver();
        driver.get("http://www.popuptest.com/popuptest2.html");
        driver.quit();  // using QUIT all windows will close
    }
}
Switching Between Frames
To access GUI elements in a Frame, we should first direct WebDriver to focus on the frame or pop-up window first before we can access elements within them. Let us take, for example, the web page http://demo.com/selenium/deprecated.html

This page has 3 frames whose “name” attributes are indicated above. We wish to access the “Deprecated” link encircled above in yellow. In order to do that, we must first instruct WebDriver to switch to the “classFrame” frame using the “switchTo().frame()” method. We will use the name attribute of the frame as the parameter for the “frame()” part.
package newproject;
import org.openqa.selenium.By;
import org.openqa.selenium.WebDriver;
import org.openqa.selenium.firefox.FirefoxDriver;
public class PG4 {
	  public static void main(String[] args) {
		  	System.setProperty("webdriver.gecko.driver","C:\\geckodriver.exe");
		  	WebDriver driver = new FirefoxDriver();
	        driver.get("http://demo.com/selenium/deprecated.html");
	        driver.switchTo().frame("classFrame");
	        driver.findElement(By.linkText("Deprecated")).click();
	        driver.close();
	    }
}
After executing this code, you will see that the “classFrame” frame is taken to the “Deprecated API” page, meaning that our code was successfully able to access the “Deprecated” link.
Switching Between Pop-up Windows
WebDriver allows pop-up windows like alerts to be displayed, unlike in Selenium IDE. To access the elements within the alert (such as the message it contains), we must use the "switchTo().alert()" method. In the code below, we will use this method to access the alert box and then retrieve its message using the "getText()" method, and then automatically close the alert box using the "switchTo().alert().accept()" method.
First, head over to https://output.jsbin.com/usidix/1 and manually click the “Go!” button there and see for yourself the message text.
.png "Creating your First Script in Webdriver")
Lets see the Selenium example code to do this-
package mypackage;

import org.openqa.selenium.By;
import org.openqa.selenium.WebDriver;
import org.openqa.selenium.firefox.FirefoxDriver;

public class myclass {

    public static void main(String[] args) {
    	System.setProperty("webdriver.gecko.driver","C:\\geckodriver.exe");
        WebDriver driver = new FirefoxDriver();
        String alertMessage = "";

        driver.get("http://jsbin.com/usidix/1");
        driver.findElement(By.cssSelector("input[value=\"Go!\"]")).click();
        alertMessage = driver.switchTo().alert().getText();
        driver.switchTo().alert().accept();

        System.out.println(alertMessage);
        driver.quit();

    }
}
On the Eclipse console, notice that the printed alert message is:
.png "Creating your First Script in Webdriver")
Waits
There are two kinds of waits.
- Implicit wait – used to set the default waiting time throughout the program
- Explicit wait – used to set the waiting time for a particular instance only
Implicit Wait
- It is simpler to code than Explicit Waits.
- It is usually declared in the instantiation part of the code.
- You will only need one additional package to import.
To start using an implicit wait, you would have to import this package into your code.
![]()
Then on the instantiation part of your code, add this.
.png "Creating your First Script in Webdriver")
Explicit Wait
Explicit waits are done using the WebDriverWait and ExpectedCondition classes. For the following Selenium WebDriver example, we shall wait up to 10 seconds for an element whose id is “username” to become visible before proceeding to the next command. Here are the steps.
Step 1:
Import these two packages:
![]()
Step 2:
Declare a WebDriverWait variable. In this example, we will use “myWaitVar” as the name of the variable.
.png "Creating your First Script in Webdriver")
Step 3:
Use myWaitVar with ExpectedConditions on portions where you need the explicit wait to occur. In this case, we will use explicit wait on the “username” (Mercury Tours HomePage) input before we type the text “tutorial” onto it.
![]()
Conditions
Following methods are used in conditional and looping operations —
- isEnabled() is used when you want to verify whether a certain element is enabled or not before executing a command.
.png "Creating your First Script in Webdriver")
- isDisplayed() is used when you want to verify whether a certain element is displayed or not before executing a command.
.png "Creating your First Script in Webdriver")
- isSelected() is used when you want to verify whether a certain check box, radio button, or option in a drop-down box is selected. It does not work on other elements.

Using ExpectedConditions
The ExpectedConditions class offers a wider set of conditions that you can use in conjunction with WebDriverWait’s until() method.
Below are some of the most common ExpectedConditions methods.
- alertIsPresent() – waits until an alert box is displayed.
.png "Creating your First Script in Webdriver")
- elementToBeClickable() – Waits until an element is visible and, at the same time, enabled. The sample Selenium Code below will wait until the element with id=”username” to become visible and enabled first before assigning that element as a WebElement variable named “txtUserName”.
![]()
- frameToBeAvailableAndSwitchToIt() – Waits until the given frame is already available, and then automatically switches to it.
.png "Creating your First Script in Webdriver")
Catching Exceptions
When using isEnabled(), isDisplayed(), and isSelected(), WebDriver assumes that the element already exists on the page. Otherwise, it will throw a NoSuchElementException. To avoid this, we should use a try-catch block so that the program will not be interrupted.
WebElement txtbox_username = driver.findElement(By.id("username"));
try{
        if(txtbox_username.isEnabled()){
            txtbox_username.sendKeys("tutorial");
        }
    }

catch(NoSuchElementException nsee){
            System.out.println(nsee.toString());
 }
If you use explicit waits, the type of exception that you should catch is the “TimeoutException”.
.png "Creating your First Script in Webdriver")
Summary
- To start using the WebDriver API, you must import at least these two packages.
- org.openqa.selenium.*
- org.openqa.selenium.firefox.FirefoxDriver
- The
get()method is the equivalent of Selenium IDE’s “open” command. - Locating elements in WebDriver is done by using the
findElement()method. - The following are the available options for locating elements in WebDriver:
- By.className
- By.cssSelector
- By.id
- By.linkText
- By.name
- By.partialLinkText
- By.tagName
- By.xpath
- The By.cssSelector() does not support the “contains” feature.
- You can instantiate an element using the WebElement class.
- Clicking on an element is done by using the
click()method. - WebDriver provides these useful get commands:
- get()
- getTitle()
- getPageSource()
- getCurrentUrl()
- getText()
- WebDriver provides these useful navigation commands
- navigate().forward()
- navigate().back()
- navigate().to()
- navigate().refresh()
- The close() and quit() methods are used to close browser windows.
Close()is used to close a single window; whilequit()is used to close all windows associated to the parent window that the WebDriver object was controlling. - The
switchTo().frame()andswitchTo().alert()methods are used to direct WebDriver’s focus onto a frame or alert, respectively. Implicit waitsare used to set the waiting time throughout the program, whileexplicit waitsare used only on specific portions.- You can use the isEnabled(), isDisplayed(),isSelected(), and a combination of WebDriverWait and ExpectedConditions methods when verifying the state of an element. However, they do not verify if the element does not exists.
- When isEnabled(), isDisplayed(),or isSelected() was called while the element was not existing, WebDriver will throw a NoSuchElementException.
- When WebDriverWait and ExpectedConditions methods were called while the element was not existing, WebDriver would throw a
TimeoutException.
Note:
driver.get(): It’s used to go to the particular website , But it doesn’t maintain the browser History and cookies so , we can’t use forward and backward button , if we click on that , page will not get schedule
driver.navigate(): it’s used to go to the particular website , but it maintains the browser history and cookies, so we can use forward and backward button to navigate between the pages during the coding of Testcase
No comments:
Post a Comment